Portrait and Figure Drawing ....
Text and photography © Marvin Bartel, Ed.D.
|
|
|
These
are drawing lessons that make the hard stuff easier. Students gain
confidence doing real observation and expression. No copy work is
involved. I remind students that the purposes of practice is to make
things easier and better.
----- LEARNING PROPORTION, PLACEMENT, SIZE RELATIONSHIPS ---------
Learning to see size and scale relationships are one of the learning challenges when we learn to draw from observation. Older children can learn to do sighting by comparing measurements taken by extending a stiff arm forward and using the pencil to measure sizes and distances and comparing them. Students can also use viewfinders (including those with grids made with black threads).
This practice session uses an actual frame around the person being observed to make it easier for children as young as first grade to become aware of the size relationships. Additionally, each student uses a small frame that has the same aspect ratio as the large frame being observed.
 |
|
LEFT: Each student has a small frame of the same proportions as the life-sized frame in the background. The frame makes it easier to become aware of sizes relationships. After making the clay figure, the students draw the figure on paper that already has the frame drawn on the edges of the paper. They work on paper that has been cut to the same aspect ratio as the life-sized frame and the same size as the small wood frame used for the clay figure. |
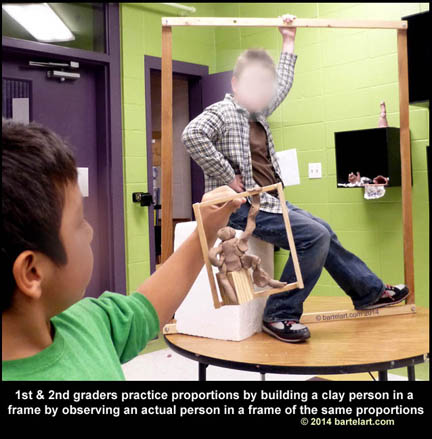
ABOVE: A first grade student compares his clay figure with the actual model sitting in the frame. |
|
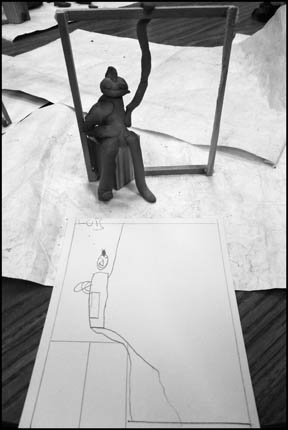
ABOVE: A first grade drawing based on her clay sculpture that was based on the model sitting in the frame. |
---------------- PRACTICE DRAWING THE SELF (self-portraits)------------------------------------------------
- Each
day they draw one practice drawing of a self-portrait directly on a
mirror using the type of felt tips used for overhead projectors (these
marks wipe off with moist paper towel). These drawings can be traced
onto typing paper.
- Each day after making a practice self-portrait, finish the period doing figure drawings (see below).
- After
at least five sessions of practicing directly on mirrors, move to using
the mirrors for reference for a self portrait painting that can take
several periods.
- Instead of
giving prior instruction such as how high the eyes are in a face, I ask
the students to tell me how high the eyes are in the face.
Practicing
Three Ways to Draw a FIGURE. Each day, after a self-portrait practice,
practice figures drawing by the three methods below.
- BLINDER BUDDY drawing helper practice
Use
Blinder Buddy helper on pencil so the drawing is not seen while edges
(contour) of figure are drawn. Only look under the drawing helper at
when starting a new line.
- INSIDE OUT GESTURE practice
- Pose the figure in an active athletic pose with slanted and extended arms and legs.
-Add pieces of tape at each joint of the figure to give structural emphasis to the model.
- Work on large brown or white wrapping paper.
- Use the side of a piece of dark crayon, Conte crayon, or synthetic charcoal. Anything that is very bold.
- Allow absolutely NO OUTLINES
- START IN THE CENTER of body and very rapidly shade in the whole figure with VERY fast gestural hatching.
- NEVER LIFT the crayon from the paper. Keep it in CONSTANT MOTION but
vary the pressure. Fill in a bit of the body, move to a leg, to the
head, to an arm, etc., never finishing one part before all parts are
started. Keep building up all parts until all parts are finished.
Finish in two minutes or faster.
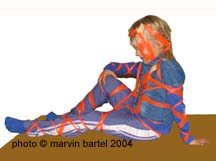
- INVISIBLE FIGURE DRAWING
Use
high visibility pink or orange very thin plastic ribbon from building
supply stores (used to mark stakes during construction).
Pose figure in active athletic pose. Wrap with ribbon. Tape it in place.
Draw ONLY the ribbon - not the figure.
SAFETY NOTE: Use
only thin plastic ribbon that can break very easily. Use only with
adult supervision. Do not tie knots. Fasten ribbon with pieces of tape.
|
 |
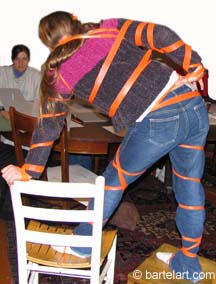
Invisible Figure Drawing using Blinder Buddy
drawing helper to conceal paper during drawing.
back to top of article
Equipment:
Each student needs
- a
mirror about 8 x 10 inches. Get the least expensive mirrors cut by the
local glass company and tape them with duct tape to 9 x 12 inch pieces
of foam core. Cover all sharp edges with tape. Hinge another piece of foam core to the top edge with
duct tape so they can stand like an easel in front of the student.
Student assistants can help make these.
- A blinder buddy is a big card on the drawing pencil to hide the drawing
- Some bright ribbon sold to building contractors
|
Art History:
After
the students have practiced and completed their own expressive original
drawings and paintings, and had a critique discussion, they will have a sound frame of reference and
strong interest in the study of the self-portraits and figure drawings
of famous artists such as Kathy Kollwit, Frida Kahlo,
Pablo Picasso, Rembrandt, and others. Search others by artist name,
self portrait, and drawing. An Internet image search will find many
examples of their work.
|
CLASS CRITIQUES - do NOT skip them. Try this approach.
Many art teachers fear the critique session? Many are skipping the critique. How much learning are students missing? Why not try a new approach? Class critique in studio art should never be handled like a debate class. It is not a competition or a contest. Try this approach that can totally change the culture of the studio art class. Try a new approach. Watch motivation and learning double.
Include a Rubric for this lesson. Testing in Drawing class. Turning in Grades in Art.
ABOVE:
Modeling and drawing Invisible Figure Drawing (cross-contour drawing)
where only the orange ribbon is drawn. Blinder Buddy is used to hide
paper while drawing.
SAFETY NOTE: Use only the very thin plastic ribbon that can break very easily. Use only with adult supervision. Only fasten it with pieces of tape. Do not tie knots.
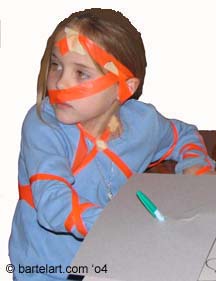
An Invisible Figure Drawing
(blind cross contour) by a 4th grade student.
HELP! Have you tried this lesson or parts of this lesson in your class? Send me an email note
with your ideas for improvements, your questions, or other creative
ideas that occurred to you or your students as you worked with this
lesson.
Other on-line Art Lessons and essays by the same author
Teaching The Secrets of Generating Art Ideas: An Inside Out Art Curriculum
Creativity Killers in the art room
How to teach creativity
Conversation Game to generate creative ideas for artwork and to foster social skills
Advocacy for Art Education in our schools
biography of author
All rights reserved. This page © Marvin Bartel, Emeritus Professor of Art, Goshen College. Teachers
many make a single copy for their personal use so long as this
copyright notice is included. Scholarly quotations are permitted with
proper attribution. Posted January 3, 2006. Last updated JAN 21, 2014
For permission to make copies or handouts, contact the author
|