Art Lesson
by Marvin Bartel
© 2004 - updated 1/15/2014
Related Links
Learning to Think Artistically
Other Art Lessons on this site
Wire Sculpture lesson
Self-portrait & figure lessons
Planning a Creative Art Lesson/Unit
Teaching Creativity
Creativity Killers
Idea Generation as Art Curriculum
other lessons
new in 2006
Generating Ideas for art Lessons - More Sources of Ideas for Art Lessons 2007
Biography of author
All rights reserved. © 2004, Marvin Bartel. You
are invited to make a link to this page. Art teachers may print a copy
for their own use and teachers may forward this page to other teachers
so long as the copyright and Internet URL (address) is with it.
This lesson may not be posted on a web site or published in any form without permission. Brief credited quotations in scholarly reviews are permitted. Links to this page are welcome.
What is learned in this lesson?
Collage assignments are particularly suited to thinking about composition.I ask students to make choices until they have a complete composition before allowing them to attach any parts. This also gives them practice in discussing composition with peers so that they learn to become more articulate about design and composition.
The shape and figure cutting gives students practice in observation without some of the fear associated with drawing and without the excessive erasing habits.
Art history is learned after students have built a frame of reference. By placing it after the media work, the art history does not answer the questions for the students. They still have to practice their own choice making and creativity.
BASIS PRINCIPLES
USED TO LEARN HOW TO THINK CREATIVELYThe sequence is very important in an art lesson. None of the lessons that I offer as examples show examples at the beginning of the lesson. In every lesson that I offer, the exemplars are studied after the students have creatively worked from some combination of observation, imagination, and or their own experiences.
In drawing lessons, I do not draw for students to show them how I draw things. I show them how I look at things in order to see them better.
Instead of demonstrations, I give the students brief, but relevant hands-on practice to introduce new methods of working.
RESPONDING TO STUDENT REQUESTS FOR HELP
When a student asks me for a suggestion, I refrain from telling them how I would do it. As an artist, I always have an idea, but I try not to mention it. I ask them to give me their ideas and we discuss their ideas. Often I encourage them to try and compare two of their own ideas to see which one works best for them. I believe they should learn how artists use experiments to solve problems rather than becoming dependent on experts. I will offer to help by asking open questions that help them focus on things that can be learned through experimentation. Eventually, I want them to learn that artists who know how to ask good questions are more successful than artists who have learned a set of rigid answers.
NOTES on what to change next time I teach this lesson:
|
Be courageous! This lesson works anytime, but it can be a great first lesson to help the teacher get to know each student better. Using it as a first lesson sets a standard that builds self-confidence, working habits, and reassures students that there are ways to succeed without resorting to copying or depending on the look of the work of artist about which they know little or nothing. The self is of such intense interest that students need very little outside input to get inspired. Be sure to add points for lots of good humor. |
Make it easier Use mirrors (see mirror note at bottom) with clear plastic taped to them . Students each trace a picture of self in the mirror on the plastic on the mirror with marker. Close one eye or use black pirate eye patch on one eye when tracing own image on mirror.
BACKGROUND For the examples shown on this page the students
took a piece of paper gray paper home and brought it back with three to
five shapes cut to symbolize things particularly meaningful to
them. These shapes were incorporated into the self-portrait
collage. All left over paper (negative shapes) were to be brought
back for possible inclusion in the collage. I ask them to make the shapes large enough to use the whole sheet of 12 x 18 inch grey paper..
General Instructions
Transfer
the drawings from the clear plastic to other materials until they are
impressive, expressive, or just plain fun to look at - see variations
below. Add sophistication by practicing and
repeating. Stop periodically and ask students to select the
best example from their own pile. Directional lighting
helps. Instruct students to keep all paper scraps and explore the
use of leftover pieces in the compositions. Delay
gluing of collage materials until several variations are tested by
viewing from a distance. Ask for viewing by more than one person with
the artist. Provide double face tape to make tentative
compositions. Allow and expect fast students to
make more variations than slower students. All students do many
variations. Also see endnote on how to start the class without wasting student time.
Time
This
could take a week or more of art classes or it could be every Monday
for a month or more. Considering all the possible variations this
lesson can be repeated so long as new variations are used or so long as
students are interested in improving previous variations.
---back to top
Variations
The teacher practices variations and decides which to have students do. Each variation includes limitations designed to change habits of work. Changing habits of work
insures creative thinking and problem solving. The work remains
challenging. Teacher explains processes and has students practice based
on reasonable expectations, but teacher does not show
the teacher's own rehearsal work. Students do their best and then
students decide which variations to keep - but they must keep best ones
and they must have made extra practice work that is not kept.
This student used only the elements from variation #7 below and decided not to use the self-image in the collage. She cut the shapes to represent objects she liked in her own personal surroundings. artist: Betsy Leinbach 2002 12 x 18 inches cut paper |
 Students were asked to keep both the positive and negative paper pieces to consider in their compositions. |
|---|
Below are variation examples - (teachers and students are encouraged to invent other variations, but each variation must have meaningful limits)
Only cut out shadow pieces from dark material and highlights from light materials. No whole faces - only tones.Each student selects two neutral tones and one color with the color selected on the basis of mood. To make it harder
and more challenging, use the mirrors, but draw on paper using blind
contour methods. I expect to get great results with about ten
practice pieces, but only keeping the best one or two based on choices
by the artists themselves. To make it more direct and expressive, just use the scissors and paper and no drawing tools. Cut while looking in the mirror most of the time and only glancing at the paper. Only use color as the background sheet - otherwise, use white, black and gray tones. Since drawings done on a mirror are smaller than life size, make the cut paper larger than life size.
- VARIATION Include the printed-paper text portion of a newspaper in place of a gray tone
portion of the collage. What happens when they orient it upside down or sideways? How many times should texture-tone be repeated in different shapes to make the eye move around the composition? The rotation of the text
orientation may be similar or different in each instance. What happens when they include
torn paper in place of cut paper in a portion of the collage? What if some
shapes are cut, others torn, and others both cut and
torn? Analyze the difference between the effect of cut and torn to
decide on how many of the edges need to be torn. Include an odd number of three-dimensional paper sculpture elements of varied sizes.
- VARIATION See the photo at the top of this page to see how this variation might look. I have
a female model for all the female students and a male model for all the
male students (pretend self portraits). The models take poses
that show action and directionality. We use the whole figure.
Cut the paper figures directly with no drawing. We allow starting over once. I specify size of
figure cutout, asking for the largest figure possible using at least a full 9 x 12
paper. The whole composition is 12 x 18 inches. I ask students to look mainly at model while cutting and only glance at paper to stay on track.
- VARIATION Add paint so that 20 to 40 percent of the surface is painted and 60 to 80 percent is not painted.
- VARIATION Ask students to make long narrow strips of paper to add linear elements.
- VARIATION If your class has a good sense of humor and is mature, consider asking them to exaggerate prominent features to create cartoon versions of the self. This might best be offered as an option for those who enjoy being silly - not a requirement for all.
- VARIATION Change the medium entirely. Use opaque paints such as tempera or acrylics
How does this lesson teach creative thinking? Students can do all these things without seeing any examples from the teacher, Internet, books, former students, etc. The work can be 100 percent theirs based on their own responses to concepts described and worked (played) with. They learn that their own working process can generate successful results. Students build self-esteem and know that art can be produced without reliance on influences that have little or nothing to do with their own interests or concerns. This lesson teaches creative thinking because each variation requires the solving of new problems.
Assignments must set limits that change habits of work, and push creative thinking. When an assignment sets a limits, creative thinking is required to figure out how to cope with the new limitations. A few students will insist on violating the limits. If I see that a student is breaking rules in an attempt to make the work better, my response is to enthusiastically affirm boundary breaking---especially if I see the student is not repeating her pervious trite solutions. If is an attempt to bypass thinking and problem solving by using old tried and true methods, I may decide to disallow it, and redirect the student to the problem. This activity teaches creative thinking if the teacher refrains from giving direct advice when students ask for advice. Instead of giving suggestions, I try to encourage students to come up with several ideas to do and compare. This is a standard scientific method that empowers my students to learn how to learn and learn how to set up aesthetic problems for themselves and solve them. ---back to top
How does this lesson teach critical thinking? The teacher tells them in advance that they will toss a certain percentage and keep the winners and only display the best. The teacher assures them that it is okay to be discriminating with our own work. It is also okay to have practice work. It is important that students are not allowed to toss their work before seeing and assessing their choices. Often the work itself has things to teach us about new ways of seeing. I also encourage students to always include extra eyes when assessing work. Encourage teams of students to help each other find the good things in their work. I discourage all bad-mouthing in the classroom. Negative comments are not useful among peer group art discussions. I encourage positive and neutral questions. A good neutral discussion question is, "What do you notice first, and why do you notice it?" I believe the "why" questions are most useful because they help students learn new visual concepts. Learning to sort art for quality is harder than sorting fish, but the analogy still works. Sometimes when fishing I keep a basket of small ones, but before going home, I release all but a few nice ones because cleaning fish is too much work to bother with the smallest ones. Another way to fish is to keep six fish and when I catch a seventh, I release the smallest so that I only have to clean six fish. I have often gone fishing and tossed back more than 90 percent, but the big one or two is still rewarding and tasty.
Composition Questions
During
the time students are working, the art teacher should watch for
appropriate times to stop the work and ask some questions. This is an
opportunity to let students in on the ideas and concepts that artists
would consider as they work. This can also be good
classroom management at times when students are getting too noisy or
when some students do not seem to be on task. The teacher also writes
questions on the board or on a poster so that students can review them
as they work. These are sample questions, but teachers and students
should feel free to add to this list.
- How is the effect of your work different if you have things centered compared to using informal balance? What things in your composition move the eye from place to place? What creates or implies motion in your work? How
does it change the effect of the work if lines and shapes are cut off
at the edges compared to keeping everything away from the edges? Where
is the most dominant part of your work? Where is the second most
dominant part of your work? What happens if you make an area less or
more dominant? Every visual element
can be contrasted strongly or related quietly. As you study your
composition, what are the strongest contrasts in your work and what are
most quiet relationships in your work? Do any parts of your work create a frame within the frame or edge of the work? Are any parts of the work that are positive shapes that could be repeated as negative shapes? As you look at your work, which parts come forward and which parts go back?
- Do you want your work to confront the viewer or would you rather have your work calm and relax the viewer? What things you could change to make it do more of what you want?
Art History
After
the students have gotten good at it and we have posted the best example of each
student in a display in the hallway showcase, we have conducted a class critique; they are then asked to
study something from art history or the contemporary world of
art. Given the time restraints, not every artist who has work on
the Internet is worth the class time. I suggest several criteria in
selecting artwork to study.
- Is the artist well enough known to have been selected for inclusion in major museums and major art reference books?
- Am I being gender fair?
- Do I include as many female artists as male artists?
- Do I include top artists from a variety of cultures and races?
For
this lesson the teacher could ask students to grade or rank some cut paper
works of Romare Bearden (African American) or Henri Matisse
(French). Students write a list of reasons for their grade or
rank order. Then the teacher (or a team of students) explains a
bit about the artist, his friends, his loves, his motivations, his
troubles, his quotable statements about art, and what made him tick. Art History Variation:
If the artist is Matisse, a team of students acts out a skit
where one student plays Matisse, another plays his friend Picasso,
another plays Mary Cassatt, a fourth plays an interviewer who is an art
critic for the Daily Express and has them explain and argue about their work. Variation on a variation: Cast female students in male roles and male students in female roles
and Bearden information pages and cut paper images are plentiful on the
web. Matisse painted and sculpted portraits, but do expect to find cut
paper portraits. Cut paper figures and other subjects are
abundant for both these artists. Before assigning teamwork, I review ways to be a helpful team member. Showing them a teamwork rubric before they begin helps them learn what how I expect them to participate.
end notes -------- ---back to top Why Variations?
The concept of variations is stolen directly from the working habits of
artists. Study the work of any artist. Nearly every work is a variation
of other works by the same artist. Expertise in art is based on this
wise working habit. The term variations assumes a constant. You cannot
have a variation unless there is a base point from which to vary. In
contrast to this basic concept, we find that many art classes are
taught as though art projects come from a buffet based on every flavor
and style. Expertise and quality has no chance to take root. The
victims are pride, self-confidence, and self-esteem. Dependency on the
teacher grows. A class of students sitting and waiting for a teacher to
show them what to do today can be a well managed class or it can be
evidence that students have acquired learned helplessness and dependency.
How can I start the class without wasting time?
Starting activities can be programmed so that students see what is
expected as the come into the classroom. Some teachers place an
instruction sheet on each work table. Some place notes on the board and
some use daily posters. As students enter the art room gather supplies
and preliminary practice work such as list making and sketching can take place
before any instructions are given. No time is wasted sitting around
waiting for instructions and no ideas are lost after the instructions are given while students scurry
around to pick up materials. More information about rituals to begin and end art classes. back to top
How to get enough Mirrors?
I
bought a bunch of cheap mirrors at and auction, but any glass shop can
make them. Some local shops may be willing to give you a good price if you give them a few weeks to cut them from the their remainders that are too small to sell. I cut them to 8 x 10 inches and duct taped them to slightly
larger pieces of foam core. 5 x 7 even works fine for this self portrait lesson . I used a second piece of foam core
taped to make a hinge at the top to protect the front of the mirror in
storage. The fronts covers fold back and they stand on the table like
easels. Mat board or corrugated cardboard also works to protect the mirrors and make them safer to handle.
If you try these ideas, send me a note if you have time. I would love to hear about the most unexpected thing that happened. I would love to see a result or two.
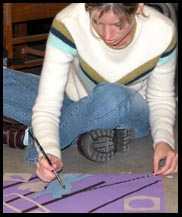
Finding her table area somewhat
congested and confusing,
this student sought out a
spot to work on the floor.
Placing a collage on the floor and standing on a chair is a great way to see if from some distance before gluing it. Looking at it with the mirror is another great way to get a more objective assessment of the composition after being so close to it while working.
END OF LESSON PAGE